 Produuz.it Docs
Appearance
Management - Company Settings
Open Company settings from the Settings section of the left menu, in company-wide mode. Company managers and admins can open it. Editing the company info, the interface settings, the backups and the work calendar is reserved for admins.
Main settings
Company info
Company info such as name, address and emails is shown on reports, mails and other templates. Company notifications are sent to the "Contact email". Admins change it with EDIT INFO on the company card.
Interface settings
Admins open these with SETTINGS on the company card. The dialog has two blocks, Interface/Viewer Settings and Company Workflow Settings.
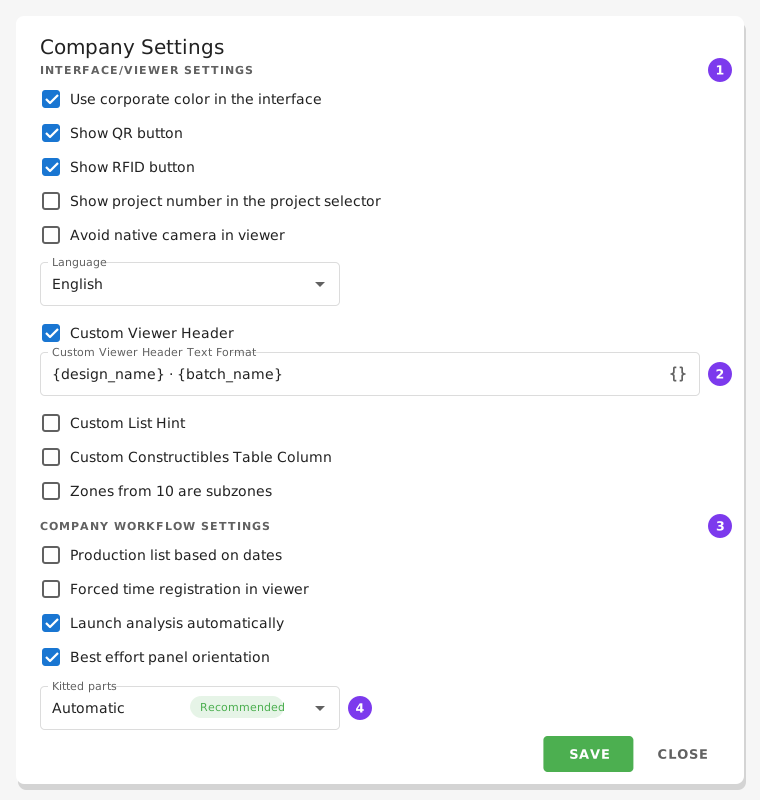
- Interface/Viewer Settings.
- A text field that takes
{property}names, with its Insert property button. - Company Workflow Settings.
- Kitted parts. See Kitted Parts.
Interface/Viewer Settings
- Use corporate color in the interface: the same switch as in the Styles card (see Styles).
- Show QR button: Show a button in the panel viewer that gives the user a QR for the panel.
- Show RFID button: Show a button in the panel viewer that gives the option to register RFID tags.
- Hiding parts in the 3D viewer is no longer a company setting. It is a custom part class in your parsing setup: give the class the rules that recognise those parts and turn on Hide in the 3D viewer. That way each setup decides for itself, instead of one switch deciding for the whole company. See: Custom part classes
- Show project number in the project selector: Adds the project number above the project name in the project selector, and next to the project name in the views that list projects from several projects at once. The number is left out when the project name or the superproject already starts with it. With this on, the selector also gets a search box that matches name, number and superproject.
- Avoid native camera in viewer: pictures are taken inside the app instead of opening the device's camera. Turn it on only if your tablets are managed by a policy that blocks the camera app, which makes the camera button open the photo gallery.
- Language: the default language for the app. Users can change the language if they are allowed by the admin (see the Users table).
- Custom Viewer Header, Custom List Hint and Custom Constructibles Table Column: replace the panel header in the viewer, the second line of each row in the viewer list, and add a column to the constructibles table, with a text you write using placeholders. See: Properties in Texts
- Zones from 10 are subzones: in the 3D viewer, zones from 10 upwards are shown together with their main zone (zone 10 with zone 1, zone -25 with zone -2, and so on).
Company Workflow Settings
- Production list based on dates: production works from a list per day instead of per project.
- Forced time registration in viewer: production users have to start the checklist of a panel before they can work on it in the viewer.
- Launch analysis automatically: on by default. New designs are analysed as soon as their files arrive.
- Best effort panel orientation: off by default. When the parsing setup cannot place a panel, its orientation is worked out from the geometry. The front face may come out on the wrong side; machine files never use it.
- Kitted parts: Off (no kit tracking), Manual (the operator marks a constructible kitted from the logistics viewer) or Automatic, marked Recommended (a constructible is kitted when all its parts are ready).
- Part reference: how part references are set: From the parsing setup, Automatic reference, or From the parsing setup, automatic when missing (the default). An automatic reference is given by the part's shape: two parts with the same shape get the same reference, even when one of them was modelled turned end for end or upside down, and a mirrored part gets a different one. This holds for projects created from 26 September 2026 on; older projects keep the references they already have.
Licenses
Gives an overview of the licensing: the maximum number of licenses per product, with how many are in use where it applies (for example 3/5), and which modules the company has.
Styles
Corporate color and logos can be changed. They are also used in PDF generation. Sticker banner is a wide logo to be used in some of the sticker presets (like panel QR stickers).
Once you pick a corporate color it is used across the interface (buttons, links) and in PDF generation. If you prefer the standard produuz.it orange in the interface, untick "Use corporate color" next to the color picker — the color is kept and still used in PDFs.
Projects
Projects are managed in Projects Settings, in the Settings section of the left menu. Projects are fabrication sets; we recommend no more than 100 designs and 500 panels per project for performance reasons. The more panels in a project, the slower the interface gets.
Some large projects do not fit in those numbers, so we introduced the "superproject" parameter, so you can group several projects under the same key name. For example, you may have a big project with 10 buildings, and you may want to split it into 10 projects that belong to the same superproject.
Projects can be "archived" 🗃. Archived projects are hidden from the user and only visible in Archived projects, at the top of the projects list. There, each archived project can be unarchived, transferred or cloned, downloaded as a ZIP, or deleted. To keep a full copy of archived projects, download them or include them in a company backup.
Project form
The ✏️ button of a project opens its form, which holds every setting of the project:
- Project data: superproject, name, client and project number.
- Project settings: engineering contact, IFC parsing setup, multipanel configuration (with the multipanel module), linked standard libraries, PDF rendering scale, start date and delivery date.
Inside a project, Project settings in the left menu opens the same form. A standard library has the same form with fewer fields: name, number, IFC parsing setup, multipanel configuration and PDF rendering scale.
Each project row also has these buttons:
- 📂 Transfer & clone: copies the project into your company, or transfers it to a partner company.
- Clone makes a copy inside your company and leaves the original as it is. The copy keeps the production line of each batch, the engineering contact, the super project, the multipanel configuration, the linked standard libraries and the dates.
- Transfer makes the copy in a partner company and archives the original in yours. Your production lines, stations, contacts and super projects stay with you, the copy always gets its own IFC parsing setup, and its parts use the partner's own stock sizes. Constructibles built from one of your standard libraries are not transferred.
- Pick what to copy: the project files, the designs with their files, and the constructibles (which need the designs). The copy gets its own copy of every file, so changing or deleting the original never touches it. It runs in the background, and you get a notification when it is done; a transfer also notifies the admins and managers of the partner company. If it fails, nothing is created.
{ }Project metadata: shows the project's stored data as JSON, and lets you download it.- 🗜 Download project (ZIP): one ZIP file with everything the project holds. Admins and managers can use it. See Downloading a project.
- 🗑 Delete: asks first whether you want to download the project. See Deleting a project.
Downloading a project
The ZIP holds the project, its phases and settings, its files (every version), the batches, the designs with their files, the modules, assemblies and parts, the part batches, the production proofs with their checklist pictures, the issues with their pictures, the production events, the reports, the rack loads, the multipanel groups and the machine files. The data is in JSON files, one per kind of item, and the files are in folders, one per item. README.txt in the ZIP explains each file, and manifest.json lists every file with its size and checksum.
The ZIP is made in the background, because a project with many drawings can take minutes. The dialog shows how many files the project has and an estimated size. When the ZIP is ready you get a notification that opens the download. The link is also emailed to the address in the dialog: yours by default, and you can change it or leave it empty. The link opens produuz.it, so you need to be logged in to use it. A download is kept 7 days; admins also find it under Company backups → Recent project downloads.
If a file cannot be read, the ZIP is made without it and MISSING_FILES.md in the ZIP lists it.
Deleting a project
Delete offers three choices:
- Download, then delete (the default): the project leaves the list at once, and is deleted when its ZIP is ready. You get a notification with the download.
- Email me the download, then delete: the same, and the link is also emailed to the address you enter (yours by default).
- Delete without downloading: deletes the project now. You confirm that you understand its files are deleted.
If the ZIP cannot be made, the project is not deleted: it stays in the archived projects and you get a notification. Production proofs are always kept, whichever choice you make.
Each project can have an engineering contact — the person to reach with questions about it, typically the responsible engineer. In the project form, pick an existing contact or create a new one on the spot. Once set, it is shown to production staff in the issue detail panel (see Contacts).
Users
The User accounts table lists everyone in the company: the people who log in and the production employees who do not. Its columns are Alias, Username, Login, Email, Role, Production station, Prod. Employees, Licenses and Actions.
User form
- Alias: required. How this person is identified in the factory; shown on the checklist and in the reports.
- Username: used to log in, and unique across produuz.it. Leave it empty for someone who does not log in.
- 🌐 Multilanguage: the user can change the language of the interface.
- 👁 Hide panel queue: if checked, the user sees only the designs mode in the viewer, not the panel list.
- 🔃 Can change station: the user can switch to another station.
- 🔄 Can change production line: the user can switch to another production line.
- 🌴 Has own holidays: if checked, the user does not get the company holidays. Only the user's own holidays are used.
- 🔨 Has own worktime: if checked, the user's own entries have priority over the company entries. This means that if you set a worktime with start and end date, all days outside this range will take company worktime.
Work Calendar
More about holidays and worktime in Work Calendar
Contacts
Contacts are people to reach about a project, such as the responsible engineer. A contact has a name, phone and email, and is not a system user.
Manage them in the Contacts table, below User accounts. You can also add a contact directly from the project form when assigning one.
A project can have an engineering contact (set in the project form). When it does, that contact is shown to production staff in the issue detail panel, so they know who to reach with questions about an issue.
API accounts
The API Accounts table, below Contacts, holds the accounts that external systems use to connect to produuz.it. See API accounts.
Machines
Machines represent CNC equipment or automated stations in your production lines. Each machine setup has a model (e.g., Mobi One) and a configuration that defines how machine files are generated.
Machine setups live in Production Settings > Machine Settings in the left menu. A setup is linked to a station, or to a whole production line, in Production Settings > Production lines.
TIP
For details on configuring production lines, stations, and machines, see the Production Lines reference page.
Work Calendar
The work calendar controls how production time is calculated across the system. It defines working hours and closed days at both the company and user level.
The Work calendar card is at the bottom of Company settings and is visible to admins only. Folded, it shows the hours per week and how many closed days are coming.
Weekly hours
The top of the card draws the week: one bar per day, with the work time in orange and the breaks striped across it, and the hours worked at the end of each day and for the whole week.
Below it, each line is a work time or a break:
- Work time or Break: a break is taken off the work time of the same days. A break that falls outside the work time of one of its days takes nothing off, and the line says so.
- Days: tap the days the line applies to.
- From / To: the start and the end time.
- Only between dates: limits the line to a period, for example a summer schedule. Both the first and the last day count.
+ Work time adds Monday to Friday from 07:00 to 16:00; + Break adds a half hour at noon on the days that already have work. Change them to your hours.
Closed days
Days nobody works, such as public holidays. Pick them in the calendar and tap a day again to remove it. The list beside the calendar shows the coming closed days by month; the past ones are folded under Past days.
Save is active only when something changed, and Discard puts back what is saved.
Users with their own hours
Individual users can have their own work time and closed days, set in the Users form with the Has own worktime and Has own holidays checkboxes. The work time is edited with the same week view and lines as the company calendar.