 Produuz.it Docs
Appearance
NiceLabel PRINT through Webhooks
A produuz.it webhook can launch the NiceLabel PRINT method, so a label is printed when something happens in production, for example when a panel starts. The nicelabel_print payload builds the print job defined in the NiceLabel Cloud Trigger API. Both NiceLabel API V1 and V2 are supported.
Go to Production Settings → Automations, open the Webhooks card and press New. Fill in the form:
- Name: a name to recognise the webhook, like
NiceLabel panel labels. - events: the events that print a label, like
constructible_start. You can pick several. - Fire on every production line: turn it on to print on every line, including lines created later. Otherwise, pick the lines in Production lines. With no line and the switch off, the webhook never fires.
- Payload content: select
nicelabel_print. It can be combined with other blocks, but NiceLabel only needs this one. - auth header type: select
None. - URL: your NiceLabel Cloud Trigger URL, like
https://labelcloudapi.onnicelabel.com/Trigger/v1/CloudTrigger/Api-CloudIntegrationDemo-Print. - custom headers: press ADD and add
Ocp-Apim-Subscription-Keywith your NiceLabel subscription key (this header may not be needed in your setup).
Once nicelabel_print is selected, a Payload Extra Fields section appears under Payload content. Expand it and fill in:
- printer name: the NiceLabel printer name, like
ZEBRA R-402. - file path: the NiceLabel label path, like
/panels/panel_label.nlbl. - api version: the NiceLabel cloud API version,
v1orv2.v2is the default.
Your form should look like this:
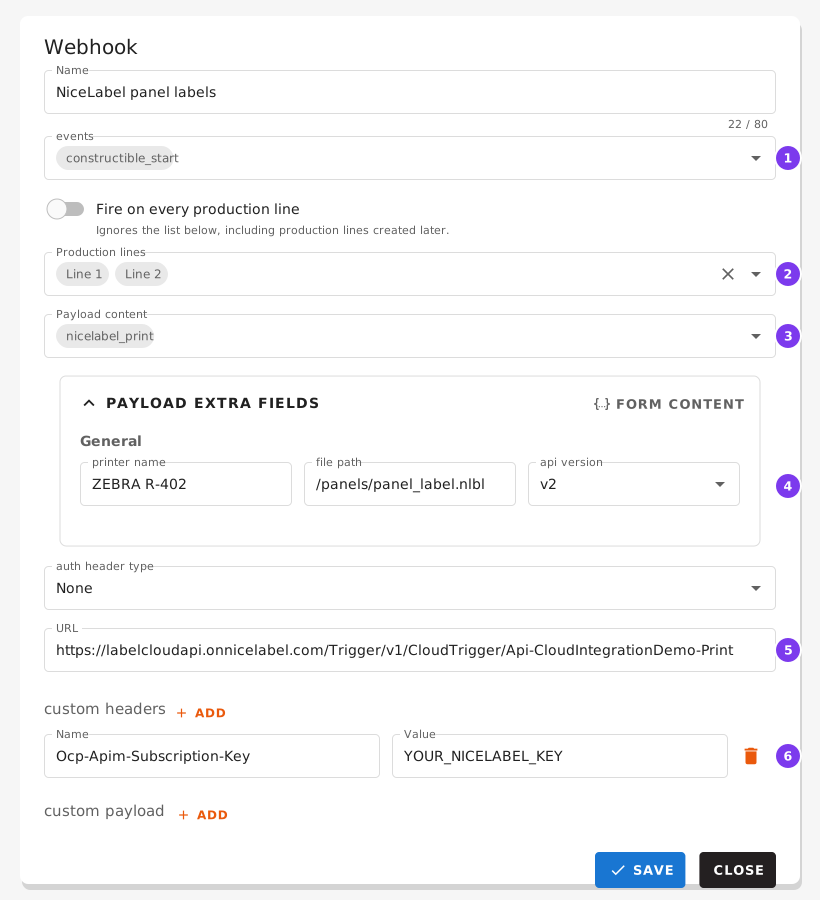
- The events that print a label.
- The production lines it prints on. Or turn on Fire on every production line above it.
nicelabel_printas the payload content.- The Payload Extra Fields section that appears with it: printer, label file and API version.
- Your NiceLabel Cloud Trigger URL.
- The subscription key header, if your NiceLabel setup asks for one.
Press Save. For API V2, NiceLabel cloud receives a payload like this:
json
{
  "event": "constructible_start",
  "deviceType": "CloudPrinter",
  "deviceId": {
    "printerName": "ZEBRA R-402"
  },
  "filePath": "/panels/panel_label.nlbl",
  "quantity": "1",
  "dataSources": [
    {
      "uuid": "e8f7e7f7-3b27-41e0-bb78-99eae64ba7cd",
      "design_uuid": "db0cb2a6-8fbf-46ac-81f5-ece6faca584e",
      "design_name": "ML-0B-5",
      "status": "waiting",
      "scheduled_prod_date": "2023-11-11",
      "client_order_id": "1030622",
      "batch_uuid": "e8986e12-4454-4ae5-a40d-4929d6a5b789",
      "batch_name": "Batch",
      "phase": "Phase_1",
      "project_name": "Block A - 12",
      "project_number": "2024-118-12",
      "super_project": "Block A",
      "client_meta__your_key_1": "XXXX",
      "client_meta__your_key_2": 2
    }
  ]
}
{
"event": "constructible_start",
"deviceType": "CloudPrinter",
"deviceId": {
"printerName": "ZEBRA R-402"
},
"filePath": "/panels/panel_label.nlbl",
"quantity": "1",
"dataSources": [
{
"uuid": "e8f7e7f7-3b27-41e0-bb78-99eae64ba7cd",
"design_uuid": "db0cb2a6-8fbf-46ac-81f5-ece6faca584e",
"design_name": "ML-0B-5",
"status": "waiting",
"scheduled_prod_date": "2023-11-11",
"client_order_id": "1030622",
"batch_uuid": "e8986e12-4454-4ae5-a40d-4929d6a5b789",
"batch_name": "Batch",
"phase": "Phase_1",
"project_name": "Block A - 12",
"project_number": "2024-118-12",
"super_project": "Block A",
"client_meta__your_key_1": "XXXX",
"client_meta__your_key_2": 2
}
]
}project_name, project_number and super_project come from the project of the panel's batch. They are empty when the batch has no project.
Each key of the panel's client_meta is added to the data source with the client_meta__ prefix, so your label can use it as a variable.
For API V1, it receives this:
json
{
  "event": "constructible_start",
  "FilePath": "/panels/panel_label.nlbl",
  "FileVersion": "",
  "Quantity": "1",
  "Printer": "ZEBRA R-402",
  "PrinterSettings": "",
  "PrintJobName": "",
  "Variables": [
    { "Name": "uuid", "Value": "e8f7e7f7-3b27-41e0-bb78-99eae64ba7cd" },
    { "Name": "design_uuid", "Value": "db0cb2a6-8fbf-46ac-81f5-ece6faca584e" },
    { "Name": "design_name", "Value": "ML-0B-5" },
    { "Name": "status", "Value": "waiting" },
    { "Name": "scheduled_prod_date", "Value": "2023-11-11" },
    { "Name": "client_order_id", "Value": "" },
    { "Name": "batch_uuid", "Value": "e8986e12-4454-4ae5-a40d-4929d6a5b789" },
    { "Name": "batch_name", "Value": "Batch 1" },
    { "Name": "phase", "Value": "Phase_1" },
    { "Name": "project_name", "Value": "Block A - 12" },
    { "Name": "project_number", "Value": "2024-118-12" },
    { "Name": "super_project", "Value": "Block A" }
  ]
}
{
"event": "constructible_start",
"FilePath": "/panels/panel_label.nlbl",
"FileVersion": "",
"Quantity": "1",
"Printer": "ZEBRA R-402",
"PrinterSettings": "",
"PrintJobName": "",
"Variables": [
{ "Name": "uuid", "Value": "e8f7e7f7-3b27-41e0-bb78-99eae64ba7cd" },
{ "Name": "design_uuid", "Value": "db0cb2a6-8fbf-46ac-81f5-ece6faca584e" },
{ "Name": "design_name", "Value": "ML-0B-5" },
{ "Name": "status", "Value": "waiting" },
{ "Name": "scheduled_prod_date", "Value": "2023-11-11" },
{ "Name": "client_order_id", "Value": "" },
{ "Name": "batch_uuid", "Value": "e8986e12-4454-4ae5-a40d-4929d6a5b789" },
{ "Name": "batch_name", "Value": "Batch 1" },
{ "Name": "phase", "Value": "Phase_1" },
{ "Name": "project_name", "Value": "Block A - 12" },
{ "Name": "project_number", "Value": "2024-118-12" },
{ "Name": "super_project", "Value": "Block A" }
]
}The label data comes from the panel or module the event is about, so use the panel and station events (constructible_start, constructible_ready, station_start, station_ready). Every webhook body also carries the event key.